Shopify Public App Development Guide for 2026
- Shopify public app development
- Shopify app development
- Shopify API
- Shopify App Store
- eCommerce development
Launched
April, 2026

Hold on a moment. Before you even think about firing up your code editor, let's talk about the most important part of building a successful Shopify app: the plan.
I’ve seen countless projects go sideways because of a rushed or non-existent blueprint. Getting this right from the start is the single best way to avoid wasting months on a feature nobody wants and to set your app up for success from day one.
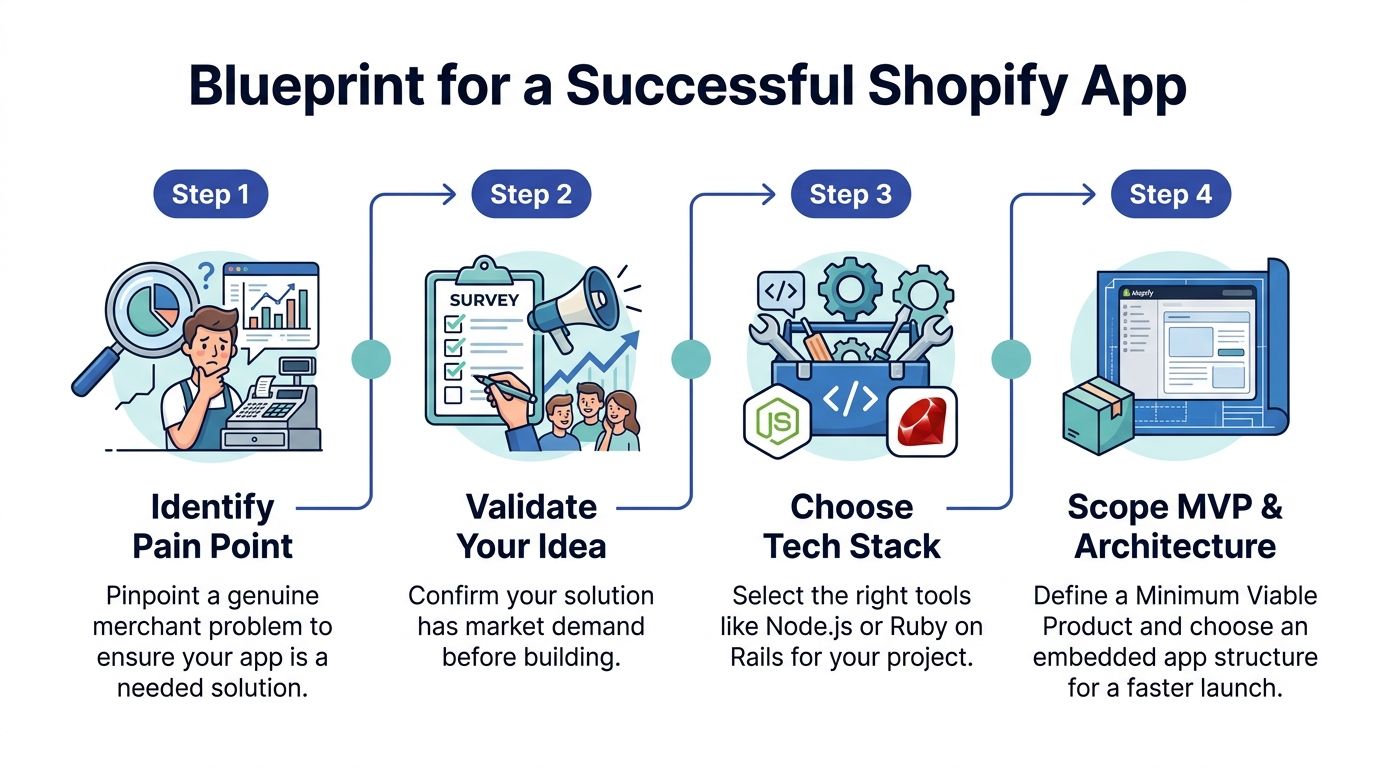
Your Blueprint for a Successful Shopify App
Every great Shopify app I've worked on started by solving one specific, nagging problem for merchants. Don't fall into the trap of building a "cool feature" and then looking for a problem it can solve. That's a recipe for a ghost town on launch day.
Instead, you need to get into the trenches. Spend time in merchant forums, sift through Reddit threads, and read the one-star reviews on competing apps. What are the common complaints? Where are merchants getting stuck or losing time? Your goal is to find a genuine pain point, and validating that your idea solves it is the first critical checkpoint.
Choosing Your Technology Stack
With a validated idea in hand, your next big decision is the technology you'll use to build it. This choice will ripple through your entire project, affecting everything from how fast you can build to how easily you can scale down the road.
There’s no one-size-fits-all answer here. The best stack is often the one your team already knows well, but Shopify definitely has its preferences.
Below is a quick comparison to help you weigh your options.
Technology Stack Comparison for Shopify Apps
| Stack | Key Advantages | Best For | Learning Curve |
|---|---|---|---|
| Node.js with Remix/Next.js | Official Shopify recommendation; seamless JS/TS workflow; excellent tooling (App Bridge, Polaris). | New Shopify apps where you want the most "native" development experience and long-term support. | Moderate, especially if new to these specific frameworks. |
| Ruby on Rails | A classic in the Shopify world; rapid development ("convention over configuration"); mature ecosystem. | Teams with existing Rails expertise who want to move quickly on a well-trodden path. | Moderate to High, if new to Ruby. |
| PHP with Laravel | Huge developer community; strong ecosystem; very mature and stable language. | Teams deeply proficient in PHP looking to build robust, scalable applications. | Low to Moderate, if familiar with MVC patterns. |
| Python with Django/Flask | Excellent for data-heavy apps; clean syntax; strong backend and API capabilities. | Apps that need complex data processing, machine learning, or extensive backend logic. | Moderate, depending on the chosen framework. |
Ultimately, the Shopify APIs are language-agnostic, so you can use almost anything. But sticking closer to the recommended Node.js or Rails stacks will generally give you a smoother ride.
As you map this out, be realistic about your team’s bandwidth. If you’re feeling stretched or have gaps in your skillset, hiring dedicated Shopify developers can be a smart move to get your app to market faster and built to a higher standard.
Defining Your MVP and Architecture
One of the most common pitfalls is trying to build everything at once. Resist that urge. Your first goal should be to define and build a Minimum Viable Product (MVP).
An MVP isn't a half-baked app; it's a focused version that solves the core problem beautifully, and nothing more. This strategy gets your app in front of real merchants as quickly as possible, allowing you to collect feedback and make data-driven decisions on what to build next.
A crucial architectural decision you'll make early on is whether to create an embedded or standalone app. For virtually all public apps, the answer is embedded. Merchants live inside their Shopify Admin, and they expect your app to feel like a natural extension of it. Using Shopify App Bridge to embed your app is no longer a "nice-to-have"—it's an expectation for a professional, seamless user experience.
The opportunity here is massive. In the UK alone, the Shopify ecosystem is booming, powering over 135,000 active stores as of early 2026. This vibrant market relies heavily on a strong app ecosystem to thrive, which is great news for developers.
This planning phase sets the stage for all the technical work to come. To see how these blueprints translate into real-world applications, you can explore our Shopify development services and learn how we help bring these ideas to life.
Getting Your App Connected: Auth and Core APIs
With your plan in place, the first real technical hurdle is getting your app to talk to Shopify. This all comes down to authentication and how you use Shopify’s core APIs. Getting this right is fundamental; without a secure connection to a merchant's store, your app simply can't function.
The gateway to any Shopify store is OAuth 2.0. When a merchant decides to install your app, Shopify kicks off an OAuth flow. Your app needs to be ready to catch this request, validate it, and swap a temporary code for a permanent access token. Think of this token as your app’s unique key to that specific shop.
Choosing Between Online and Offline Access
A critical choice you'll make during the auth process is which access mode to request. This isn't just a technical detail—it shapes what your app can and can't do.
Online Access: This gives you a short-lived token tied to a specific user's login session. It's perfect for when a user is actively clicking around inside your app in the Shopify Admin, like pulling up a custom dashboard. Once they log out, the token is gone.
Offline Access: This is the one you need for the heavy lifting. It provides a permanent, long-lasting token that isn't tied to a user session. This is essential for any background jobs, like nightly data syncs, reacting to webhooks at 3 AM, or updating inventory levels automatically.
From experience, you'll almost certainly need both. You'll use the online token for immediate, user-driven actions in your embedded app, and the offline one for all the crucial server-side work that needs to happen without a user present. A word of warning: guard those offline tokens carefully. They grant persistent store access, so they absolutely must be encrypted in your database.
This process highlights how your initial planning and architecture choices directly determine your technical path forward.
Before you write a single line of API integration code, your purpose and architecture should already be clear. This groundwork dictates which APIs and data points you'll actually need.
Talking to Shopify: REST vs. GraphQL
Once a merchant has granted you access, you can finally start pulling and pushing data using Shopify's APIs. There are two main flavours to choose from.
The Admin REST API has been around for ages. It’s mature, reliable, and incredibly comprehensive, letting you perform basic create, read, update, and delete (CRUD) operations on everything from products to orders. Need to grab a list of all products? A simple GET request to the /admin/api/2026-07/products.json endpoint will do the trick.
For anything more complex, though, the Admin GraphQL API is usually the better tool for the job. GraphQL’s magic is that it lets you ask for exactly what you need in a single request, which saves you from fetching tons of useless data. Let's say you need an order, its associated customer, and the first three line items. With REST, you might be looking at three separate API calls. With GraphQL, you can build one clean query to get all of it at once, which makes your app far more efficient. If you want to see how this plays out in the user interface, our guide on Shopify embedded app development has some great examples.
Keeping in Sync with Webhooks
Don't fall into the trap of constantly hitting the API to check for new orders or product changes. It's wildly inefficient and the fastest way to burn through your API rate limit. The professional approach is to use webhooks.
Webhooks are essentially notifications that Shopify sends to your app’s server whenever a specific event happens. You just tell Shopify which events you care about—like orders/create, products/update, or the crucial app/uninstalled—and provide a URL. When that event fires in a merchant's store, Shopify will immediately post a data payload to your URL.
This allows your app to react in real time without ever having to ask "is there anything new yet?". It’s the only sustainable way to keep your data perfectly synchronised with the store.
Getting Paid: How to Monetise Your Shopify App
Alright, let's talk about the most important part of turning your app from a side project into a real business: getting paid. Building a slick app is one thing, but if you can't monetise it, it's just a hobby. For public apps, Shopify gives you one path to do this, and one path only: the Shopify Billing API.
This isn't just Shopify being difficult; it's a brilliant move for the ecosystem. Using their API is mandatory because it creates a seamless, trustworthy experience for merchants. They see all their app charges on one unified Shopify invoice, which simplifies their bookkeeping and builds confidence in your app. It’s a core part of your app's business model, so when you're sketching out ideas, it's worth exploring different passive income ideas for developers to land on a model that really works for the long haul.
Choosing the Right Billing Model for Your App
Shopify’s API is flexible enough to support the main ways you'd want to charge for software. Your job is to pick the model that best reflects the value your app provides.
One-Time Charge: Is your app a "one and done" kind of tool? Think of things like a theme migration service, a bulk data import, or a report generator. A one-time charge makes perfect sense here. The merchant pays once for a specific, tangible outcome.
Recurring Subscription: This is the bread and butter for most SaaS apps. You offer ongoing value, so you charge an ongoing fee. You can set up monthly or annual plans, and it's almost always a good idea to include a free trial to let merchants see the value for themselves before committing.
Usage-Based Billing: This one is a bit more advanced but incredibly powerful. If your app's costs are tied to usage—like sending SMS messages, processing transactions, or storing large amounts of data—this model is a perfect fit. You charge merchants based on what they actually use.
You can also get creative and mix these. A popular strategy is to offer a base monthly subscription that includes a certain amount of usage (say, 1,000 emails) and then use metered billing for anything over that limit. This aligns your revenue directly with the value and scale of the merchant's business.
Nailing the Billing Approval Flow
This is where many new developers trip up. Implementing billing isn't just a single API call; it’s a user flow that Shopify strictly enforces.
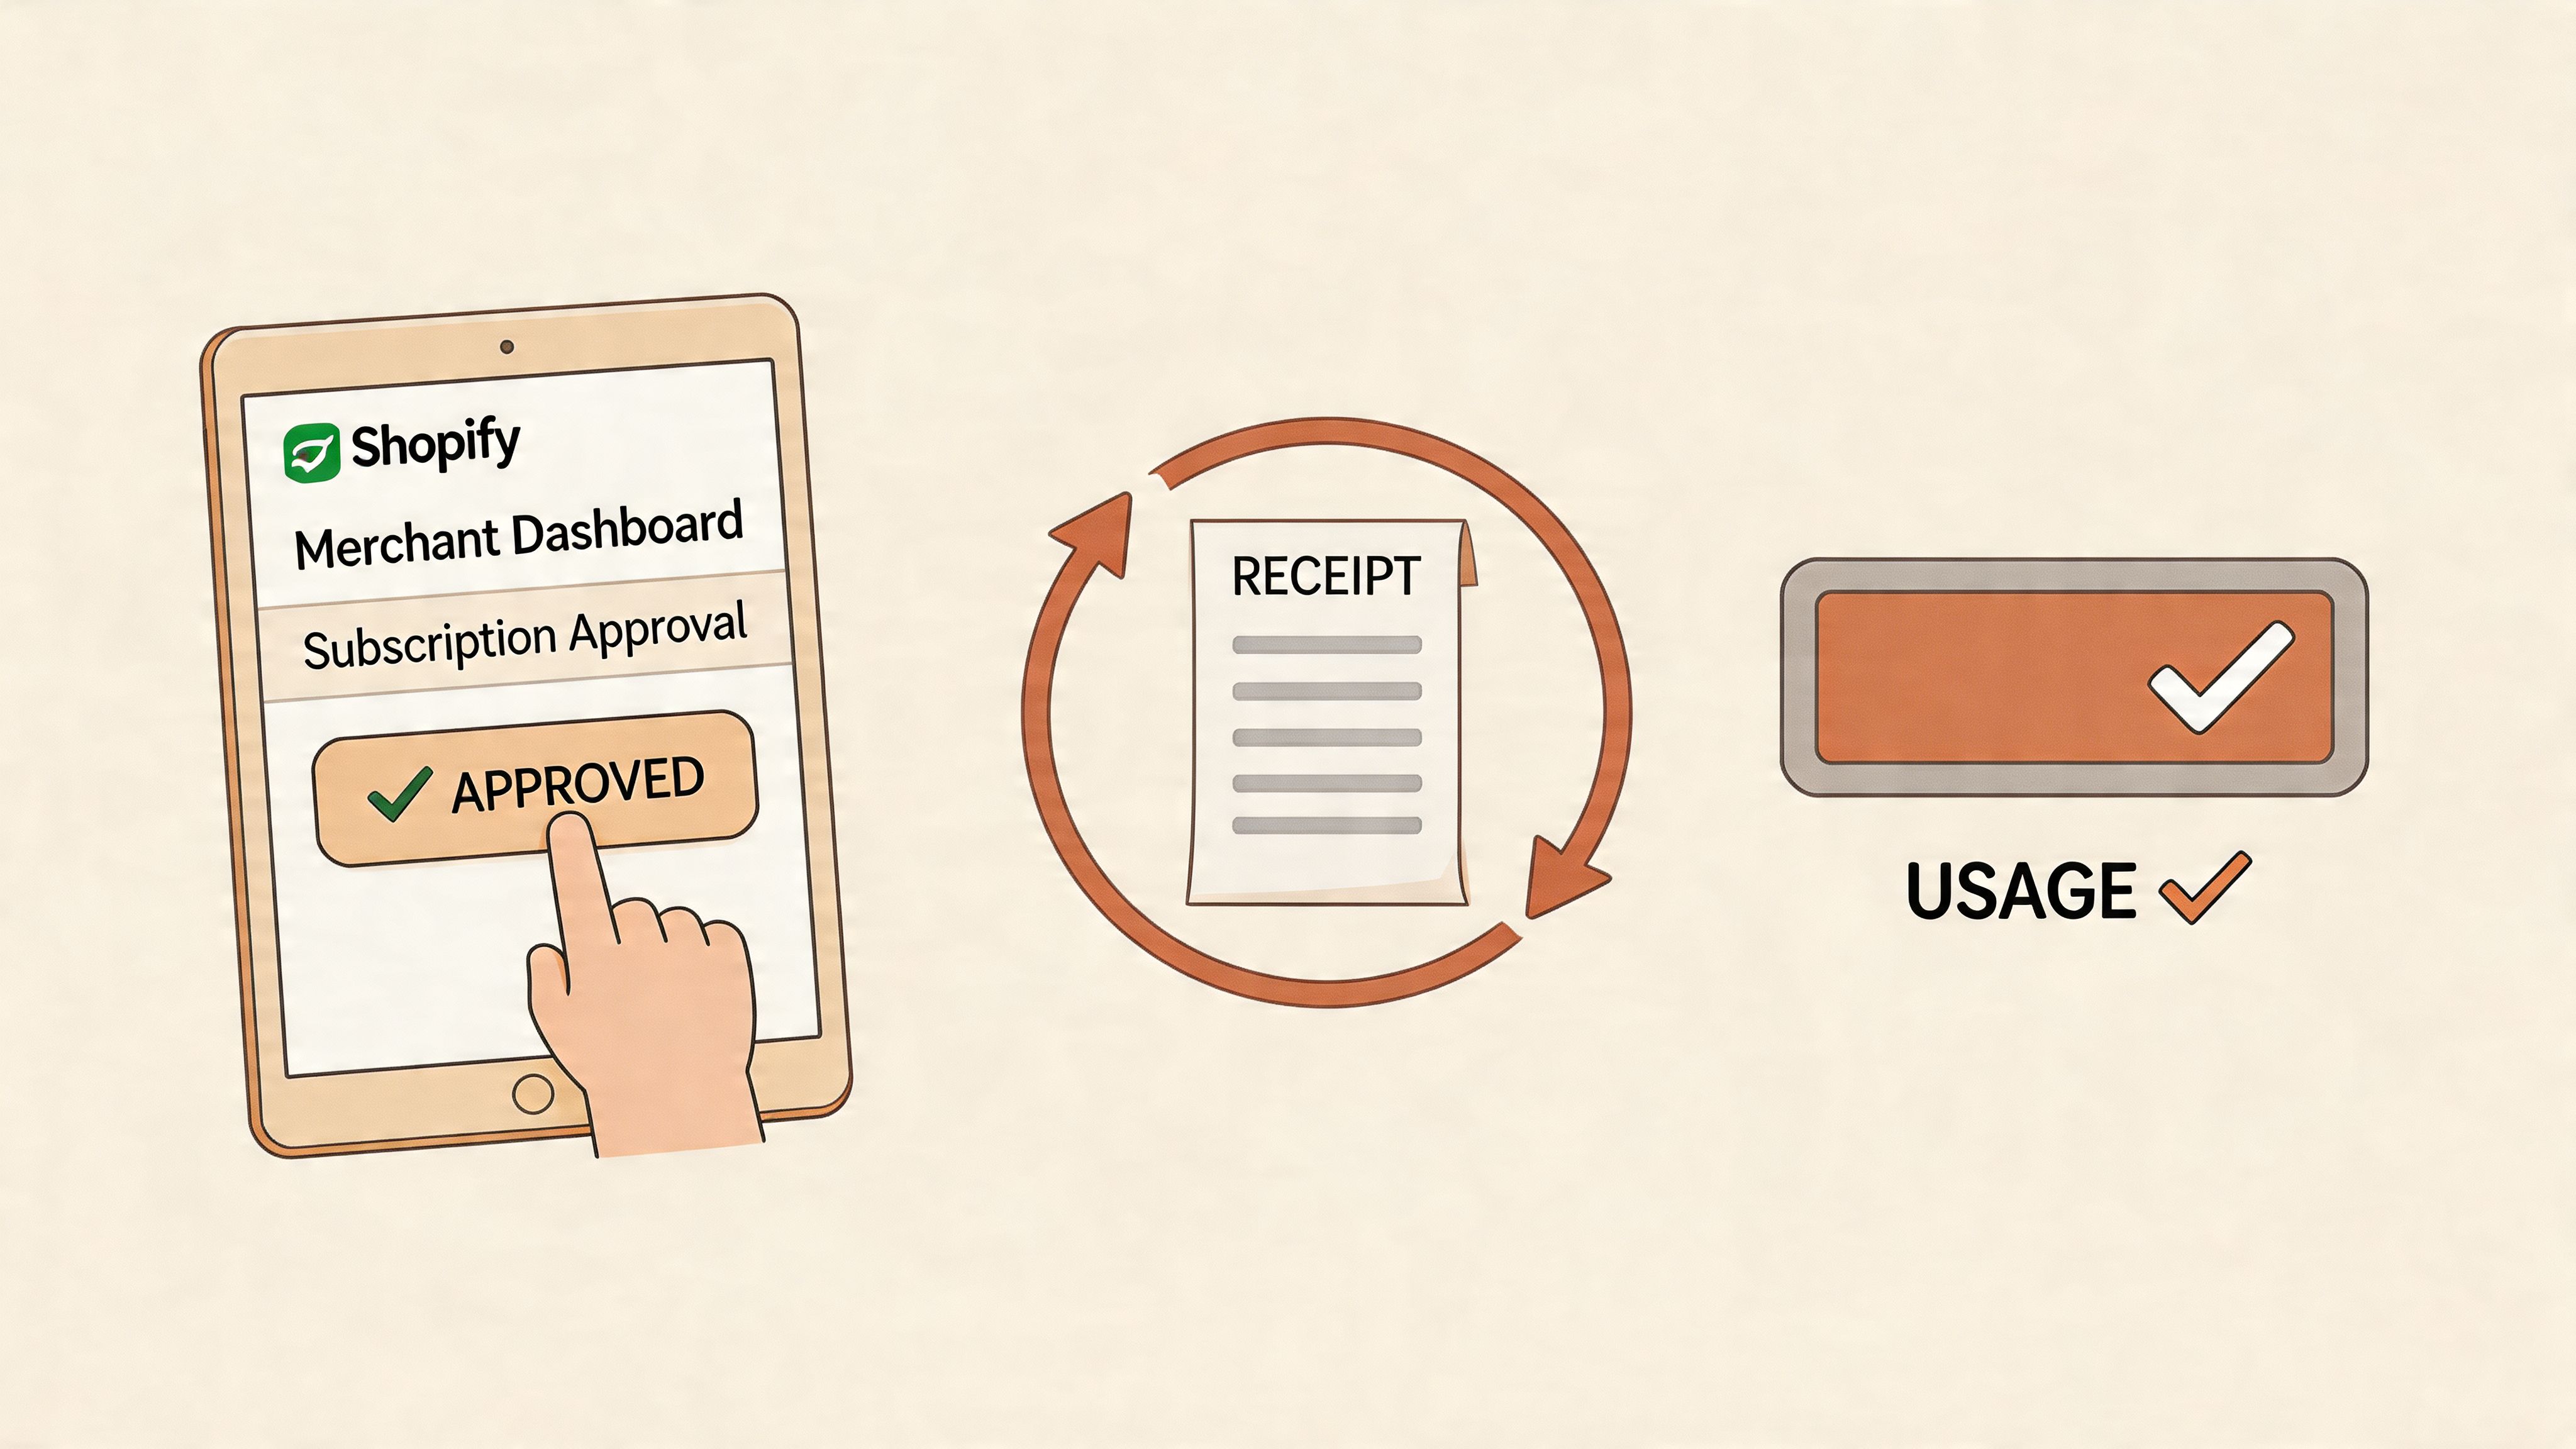
When a merchant decides to pay for your app, you can't just charge them. Your app must redirect them to a special confirmation URL that Shopify generates. On that page, the merchant gets a clear breakdown of the charge: what it's for, how much it costs, and the billing frequency. They then have to explicitly click "Approve".
Critical Takeaway: Never, ever assume a charge is active just because you initiated the process. The only source of truth is Shopify. Your app needs to wait for the redirect back from that approval page and then query the API to confirm the charge status. Only once you get that official confirmation should you unlock the paid features.
Implementing Billing with GraphQL
The modern way to handle all of this is with the GraphQL Admin API.
To create a standard subscription, you'll use the appSubscriptionCreate mutation. This is where you'll define everything about your plan: its name, price, trial period (if any), and, crucially, the returnUrl. This URL is where Shopify will send the merchant after they either approve or decline the charge.
For usage-based billing, you start by creating a subscription plan that includes a usage-based component. Then, as the merchant uses your app, you report those actions back to Shopify using the appUsageRecordCreate mutation. For example, if you charge £0.01 per image optimised, you'd fire off a usage record for every image. Shopify then bundles all these tiny charges and adds them to the merchant's next invoice.
Getting this flow right—including handling plan upgrades, downgrades, and cancellations—is a hallmark of a professional Shopify app. It ensures a predictable revenue stream for you and a fantastic, transparent experience for the merchants you serve.
Enhancing the Merchant Experience with App Extensions
The best apps don’t feel like apps at all. They feel like a native part of the Shopify platform, seamlessly blending into a merchant's daily workflow instead of pulling them into a confusing, separate interface.
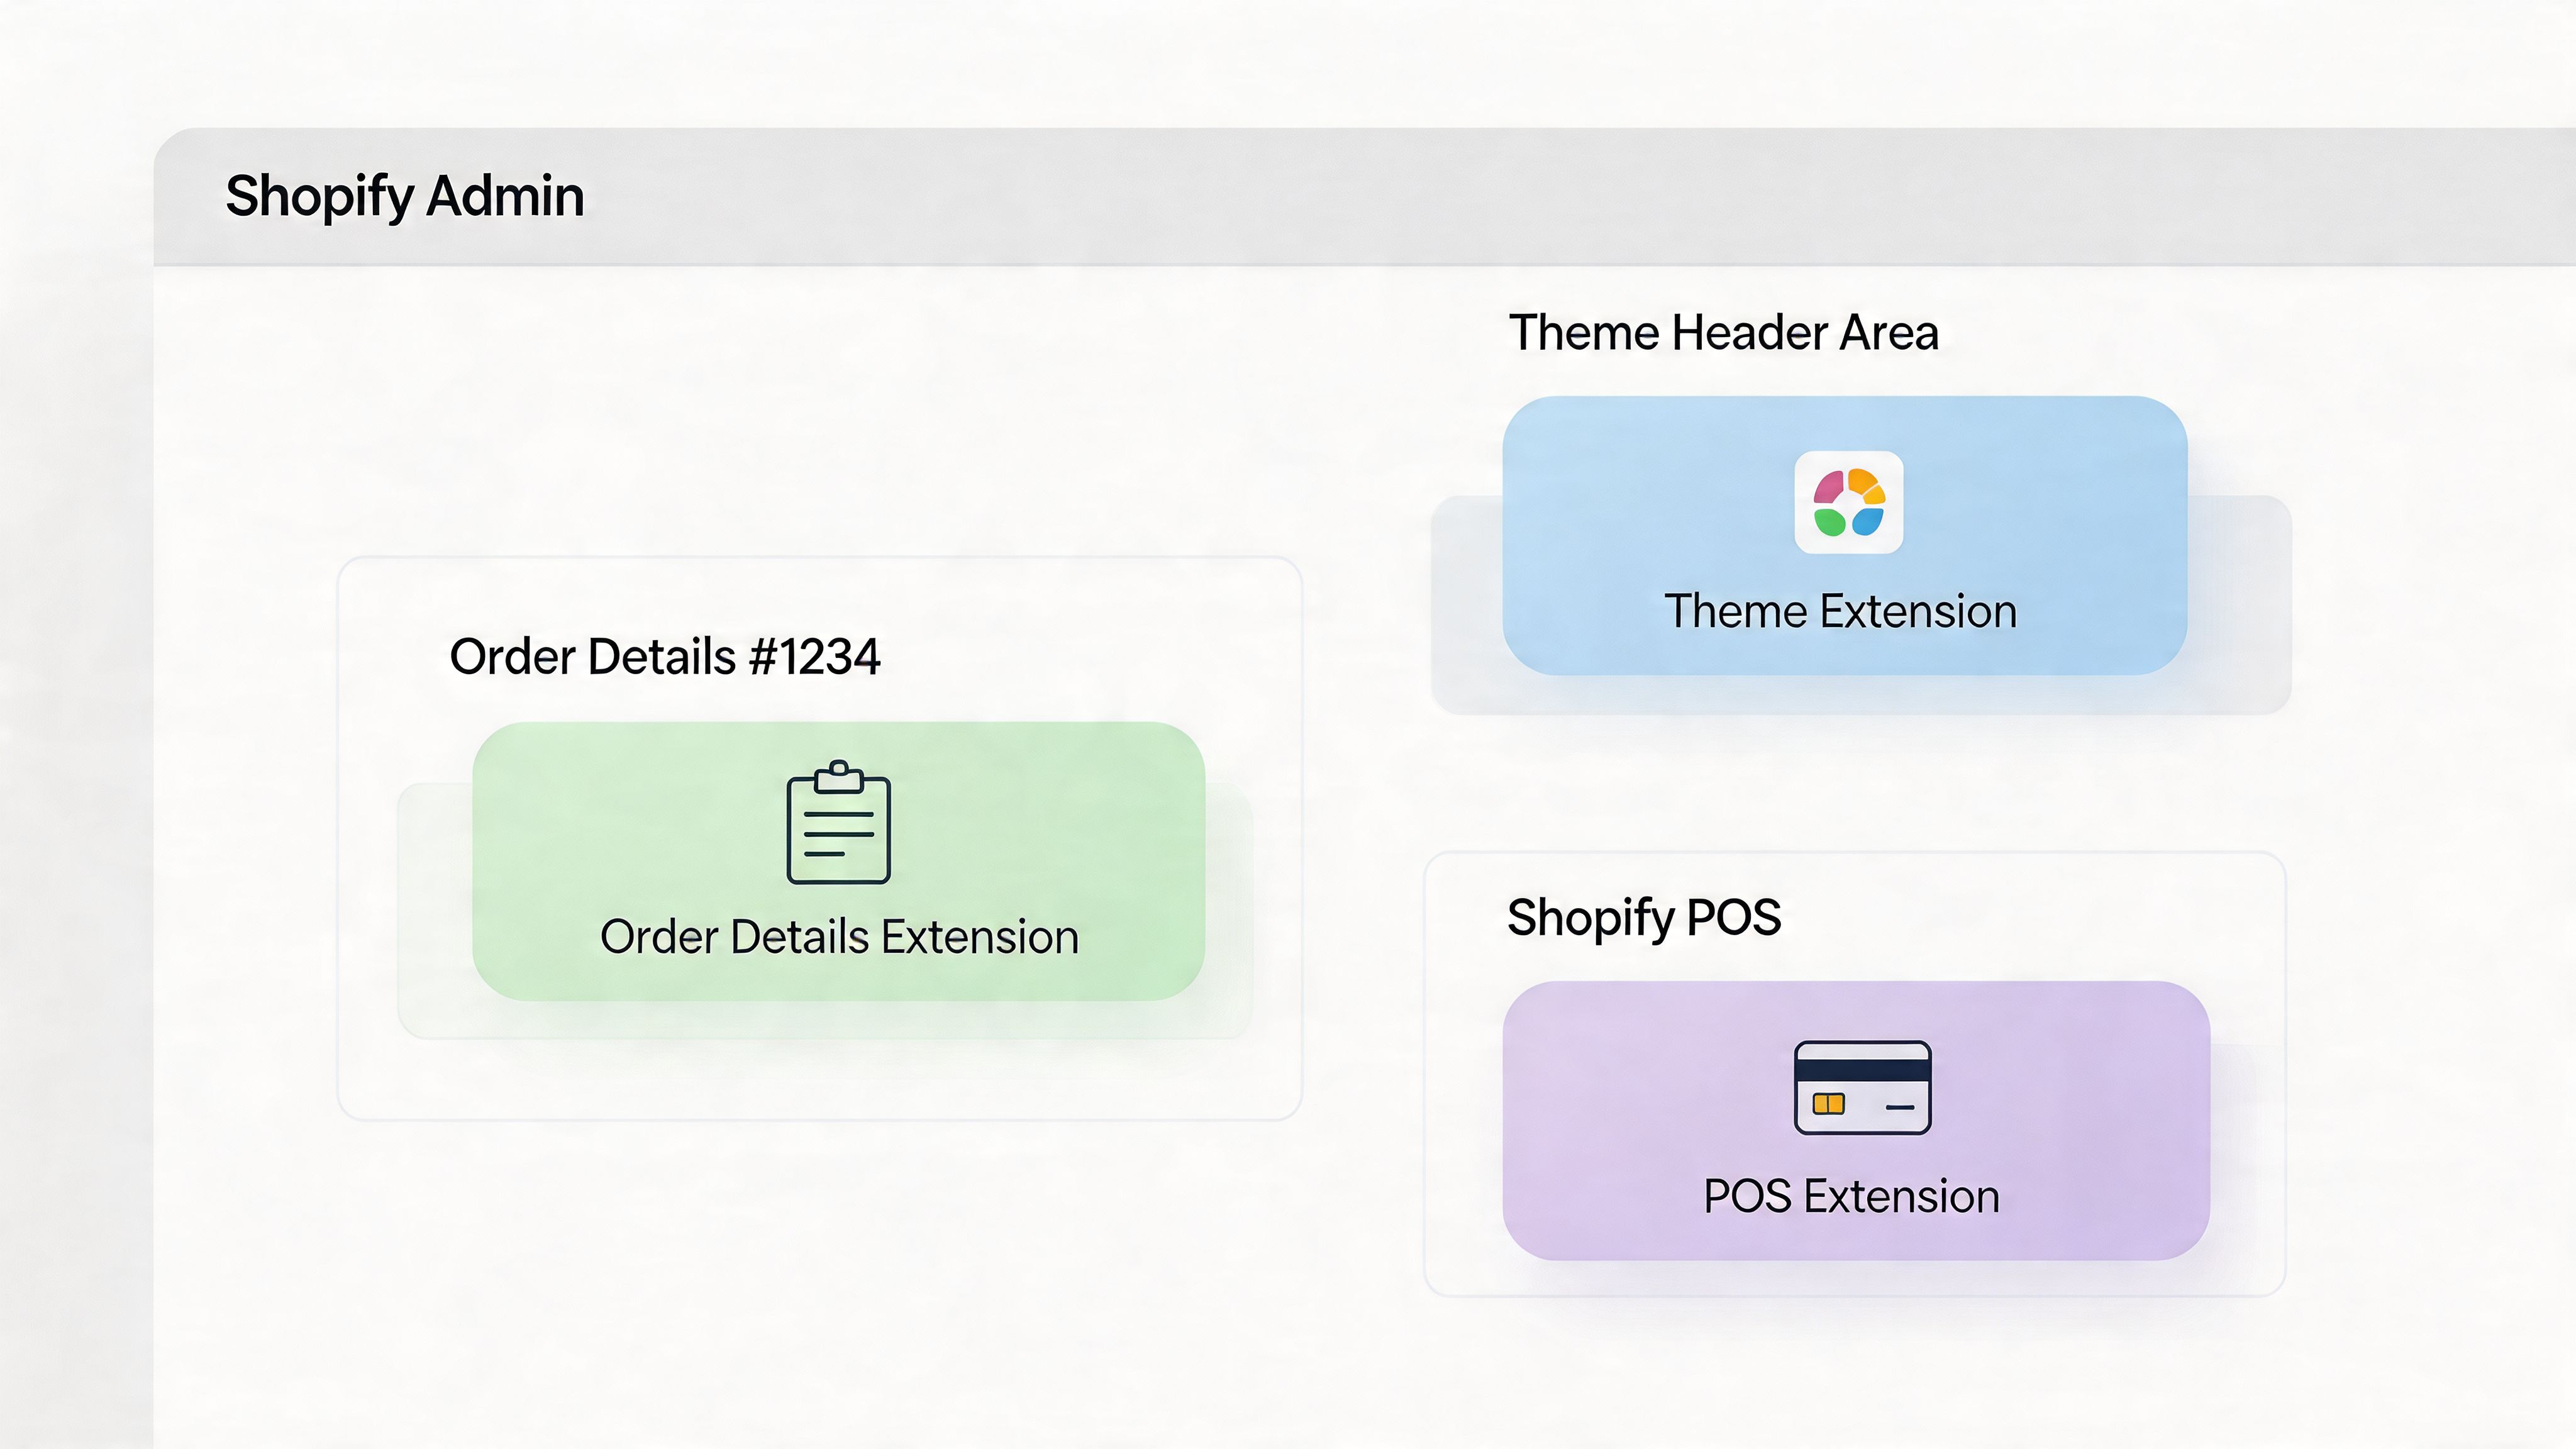
The secret to achieving this level of integration is App Extensions. They are, without a doubt, one of the most powerful tools in your arsenal, letting you inject your app's functionality precisely where merchants need it most.
Instead of a merchant having to stop what they're doing, find your app, and then search for the right feature, you can place actions and information directly into the Shopify Admin, the Point of Sale (POS) system, or even the online store theme itself. This is what separates a good app from an indispensable one.
When your features are woven into the natural fabric of the platform, merchants start to rely on them every single day. Usability and long-term adoption go through the roof.
Embedding Directly into the Storefront with Theme App Extensions
Let’s start with the most visible and often most impactful extensions: Theme App Extensions. These allow merchants to add your app's features to their live storefront using the simple, familiar theme editor—no coding required. For merchants, this is a massive win for trust and usability.
Think about it. An app that offers customer reviews, a "recently viewed" products carousel, or trust badges suddenly becomes incredibly easy to install. Merchants can literally drag and drop these blocks onto their product pages or into their site-wide header.
Here are a few powerful ways I’ve seen developers use Theme App Extensions:
- Announcement Banners: A customisable banner for promoting sales or sharing shipping updates.
- Product Badges: Eye-catching labels like "New Arrival" or "Best Seller" on product images.
- Trust Seals: Security and payment logos placed right next to the "Add to Cart" button to boost confidence.
- Floating Widgets: A persistent "Contact Us" or promotions button that follows the user as they scroll.
By using Theme App Extensions, you remove the single biggest point of friction for most merchants: the fear of touching their theme's Liquid code. The ability to enable a feature with a single click makes your app 10 times more appealing than one that requires digging into code.
Adding Contextual Actions in the Shopify Admin
While Theme App Extensions are for the customer-facing store, Admin Link and Action Extensions are all about improving the merchant's life on the backend. These extensions let you strategically place links and buttons from your app onto key pages inside the Shopify Admin.
For instance, if you've built an app that generates custom invoices, you could use an Admin Action Extension to add a "Print Custom Invoice" button directly to the Orders details page. When a merchant clicks it, the action can trigger a modal right there in the Admin using App Bridge, or take them to a page in your app with the order ID already populated.
Some of the most common places to hook into are:
- Order details pages
- Product pages
- Customer lists
This contextual placement is incredibly efficient. The merchant doesn't have to leave the order screen, find your app, open it, search for the order, and then finally print the invoice. Your function is right there, exactly when and where they need it. Mastering this is key to building an app that feels truly integrated, a concept we explore in more depth in our guide to Shopify Polaris app design.
Ultimately, a smart extension strategy is central to building a successful Shopify app. It's about meeting merchants where they already work, eliminating friction, and embedding your app's value so deeply into their operations that they can't imagine running their store without it.
Achieving the Built for Shopify Standard
Getting that ‘Built for Shopify’ badge on your app listing is a huge deal. It’s not just a fancy icon; it’s a direct signal to merchants that your app meets Shopify’s highest standards for quality, design, and performance. In a packed App Store, that badge is a powerful trust signal that can seriously boost your installs.
This isn't about cramming in more features. It’s about proving your app is excellent in three key areas: how it performs, how secure it is, and how it feels to use. Getting these right from the start doesn't just get you through the review process; it leads to a better product that merchants will actually want to keep using.
Nailing Security: This Is Non-Negotiable
When you’re building a public Shopify app, you're handling sensitive merchant data. There’s no room for error. One vulnerability can shatter the trust you’ve worked so hard to build, and believe me, the Shopify review team looks at security practices very, very closely.
Your absolute first priority should be preventing Cross-Site Request Forgery (CSRF). You need to validate every single request to your backend to make sure it genuinely came from your app's UI inside Shopify, not from some malicious site. Shopify's App Bridge gives you the tools for this, and it’s on you to implement them correctly for any action that changes a state.
Next up, API scopes. A classic mistake I see all the time is developers requesting sweeping permissions like write_products when all their app does is read_products. Always stick to the principle of least privilege—only ask for the permissions your app absolutely needs to do its job. Asking for too much is a massive red flag for merchants and an almost guaranteed rejection from the review team.
You also have to be on top of data protection laws like GDPR. This means:
- Your privacy policy must be crystal clear about what data you collect and why.
- Merchants need a way to request their data or ask for it to be deleted.
- You must correctly handle the mandatory
customers/redactandshop/redactwebhooks to erase personal data when requested by Shopify.
Optimising for Speed and Performance
In e-commerce, every second counts. Merchants expect your app to feel like a native part of their admin—fast and seamless. Any lag is a frustration that reflects poorly on your app. ‘Built for Shopify’ has pretty strict performance criteria; your app needs to load in just a few seconds.
Database queries are a common culprit for slowdowns. Watch out for N+1 queries and use eager loading in your data models to avoid them. For instance, instead of loading an order and then running separate queries for each line item, fetch the whole lot in one go. Make sure you properly index your database tables, especially on columns you filter by often, like shop_id.
A bit of hard-won advice: set up a solid caching strategy from day one. Using a service like Redis to cache frequently accessed data that doesn’t change much (like app settings or the merchant's subscription plan) can be a game-changer. It takes a huge load off your database and can easily cut your API response times in half, making your app feel incredibly snappy.
Your app's front-end performance is just as important. You should be lazy-loading images and any components that aren't visible on the initial screen load. Minify your JavaScript and CSS, and use code splitting to make sure you're only sending the code needed for the current page.
Crafting a Seamless User Experience
Finally, your app has to be genuinely intuitive. A huge part of the ‘Built for Shopify’ standard is delivering a flawless user experience, and that starts the moment a merchant installs your app. The onboarding flow needs to be so clear that a new user can understand your app's value and get it set up in minutes.
Consistency in design is everything. Your app needs to look and feel like it belongs in the Shopify Admin. The best way to do this is by using the Shopify Polaris design system for all your UI components—buttons, modals, typography, spacing, everything. If you stray from Polaris, you create a jarring experience that makes your app feel like an outsider, which erodes trust.
Run through this simple UX checklist for your own app:
- Clear Onboarding: Is it obvious what a new user should do first?
- Intuitive Navigation: Can merchants find the features they need without thinking too hard?
- Helpful Empty States: When a list or page is empty, does the UI explain what the feature is for and how to start using it?
- Actionable Error Messages: If something breaks, does the error message actually help the user solve the problem?
Meeting these standards takes work and a real focus on quality. But the payoff is huge: an app that doesn't just get approved but actually thrives in the Shopify ecosystem by earning the trust and loyalty of merchants.
Answering Your Shopify App Development Questions
When you're diving into building a public app for Shopify, you're going to have questions. It's a complex world with its own rules, and a lot of what you learn comes from experience. To help you sidestep some common pitfalls, I've pulled together answers to the questions that come up most often from developers just like you.
What’s the Real Difference Between a Public and a Custom App?
This is the first and most important fork in the road, as it dictates your entire approach. A public app is what you see in the Shopify App Store. It’s built to be installed by any merchant, aiming for a wide audience. Think of it as a product you're launching to the Shopify community.
On the other hand, a custom app is a bespoke solution for a single merchant. It's designed to solve a very specific business problem they have, and it's installed directly on their store using a unique installation link. It never sees the App Store.
The development journey for each is completely different. Public apps are held to a much higher standard. They have to pass a rigorous review by Shopify's team, meet the demanding 'Built for Shopify' criteria, and be robust enough to handle thousands of users. Custom apps give you more freedom since there's no public review, but your work is tied to a single client.
How Much Can You Actually Earn from a Shopify App?
Everyone wants to know about the earning potential, and the honest answer is that it varies wildly. Your app’s revenue will hinge on its niche, the quality of your solution, the pricing model you choose, and how well you market it. Some developers make a nice bit of side income, while others have built multi-million pound businesses from a single app.
This isn't a get-rich-quick opportunity. The apps that truly succeed solve a major pain point for a large group of merchants and offer undeniable value. Let's run a quick, realistic scenario: a solid app priced at a £20/month subscription that attracts 500 merchants will generate £120,000 in annual recurring revenue. The top apps have thousands of users, pushing their earnings well into seven figures each year.
The crucial thing to grasp is that your earnings are directly proportional to the value you deliver. An app that reliably boosts a merchant's sales or shaves hours off their weekly workload has a far greater earning potential than a simple, nice-to-have widget.
What Are the Most Common Reasons for App Rejection?
Having your app rejected by the Shopify App Store is a frustrating setback, but it's often avoidable. Most rejections happen because of a handful of common mistakes. If you know what the review team looks for, you can get ahead of the issues.
Shopify’s primary goal is to protect its merchants, so security and performance are at the top of their checklist.
Here’s what usually gets an app sent back for rework:
- Security Gaps: This is the big one. Forgetting to validate your webhooks is a classic rookie mistake, but it's the first thing the review team checks. Other common culprits are failing to validate HMAC on requests and mishandling session tokens in embedded apps.
- Slow Performance: If your app takes ages to load inside the Shopify Admin or slows down a merchant's storefront, it's an instant no. Shopify has specific performance benchmarks you must meet.
- Asking for Too Many Permissions: Be precise with your API scopes. If you only need to read product data, don't ask for
write_products. Over-requesting permissions is a huge red flag for the review team. - A Poor User Experience (UX): A confusing onboarding process, a clunky interface, or a design that completely ignores the Shopify Polaris design system will almost guarantee a rejection.
- Botching the Billing: You must use the official Shopify Billing API. Trying to bill merchants through any other channel is a strict violation and will get you rejected immediately.
Your best strategy? Follow the 'Built for Shopify' guidelines from day one. It's your blueprint for a smooth submission.
How Should I Handle Post-Launch Updates and Maintenance?
Getting your app launched is a huge milestone, but the work doesn't stop there. A great public app needs constant attention to stay secure, functional, and valuable to merchants.
First off, you need a safe way to push updates. A solid CI/CD (Continuous Integration/Continuous Deployment) pipeline is non-negotiable. It lets you automate your testing and deploy changes without disrupting service or introducing new bugs for your users.
Next, you have to stay on top of Shopify's changes. The Shopify APIs are always evolving, with new versions being released and old ones being deprecated. It's your responsibility to keep your app compatible. When you make your own breaking changes, use API versioning to prevent them from crashing older installations.
Finally, remember that feedback from your users is gold.
- Monitor Your App: Use tools like Sentry or LogRocket to keep an eye on errors and performance issues in real-time.
- Provide Great Support: Answer support tickets and address bad reviews quickly. It solves a user's problem and shows potential new customers that you’re a developer they can trust.
- Listen and Adapt: Actively collect feature requests and feedback. This is the best way to inform your roadmap and make sure you're building something merchants genuinely need.
A well-maintained app builds trust, earns better reviews, and drives more installations. It's the cycle that separates the apps that thrive from the ones that fizzle out.
Navigating the Shopify app ecosystem can be tricky, so we've compiled some of the most common questions developers face into a quick-reference table. This should help clarify some of the foundational concepts you'll need to understand as you build.
| Question | Answer |
|---|---|
| What is the difference between a public and a custom Shopify app? | A public app is listed on the Shopify App Store and can be installed by any merchant. A custom app is built for a single merchant's specific needs and is not publicly listed. Public apps must go through a rigorous review process and meet Shopify's standards for security, performance, and user experience. |
| How much can you earn from a Shopify app? | Revenue varies widely based on the app's niche, pricing, and quality. While some apps generate supplemental income, top-tier apps can become multi-million pound businesses. In 2026, it's projected that top developers will continue to see significant earnings, with success depending on solving a major merchant problem and effective marketing. |
| What are the most common reasons for app rejection? | The most common rejection reasons include security vulnerabilities (like improper webhook validation), poor performance (slow loading times), a confusing user experience, and failing to handle billing and data requirements correctly. Other frequent issues are requesting unnecessary API scopes and not providing clear onboarding instructions for merchants. Following the 'Built for Shopify' guidelines is the best way to avoid rejection. |
| How do I handle app updates and maintenance post-launch? | Post-launch, you should have a CI/CD pipeline for deploying updates safely. Use versioning for your API changes to avoid breaking existing installations. Regularly monitor app performance, respond to support tickets promptly, and gather merchant feedback to guide your roadmap. Shopify periodically updates its APIs, so plan for ongoing maintenance to ensure compatibility and security. |
Hopefully, these answers provide a clearer picture of the road ahead. Keeping these key points in mind from the start will save you a lot of time and headaches down the line.
At Grumspot, we specialise in engineering custom and public apps that meet the highest ‘Built for Shopify’ standards. Whether you're fixing an underperforming app or building a new one from scratch, our team provides the UX/UI expertise and rapid development needed to succeed. Learn more about how we can help you at https://grumspot.com.
Let's build something together
If you like what you saw, let's jump on a quick call and discuss your project

Related posts
Check out some similar posts.

- Shopify embedded app development
Master Shopify embedded app development. Build, authenticate, deploy, & submit 'Built for Shopify' a...
Read more
- Shopify Polaris app design
Master Shopify Polaris app design with our guide. Build high-quality, review-ready apps using compon...
Read more
- built for Shopify app development
Your complete guide to Built for Shopify app development. Learn to plan, build, test, and launch a c...
Read more
- Shopify custom app developer
Guide to hiring a Shopify custom app developer. Learn about costs, timelines, hiring checklists, and...
Read more